json-server工具:快速的依赖一个json文件就能启动一个后端服务器接口。
下载:
检测是否能用:
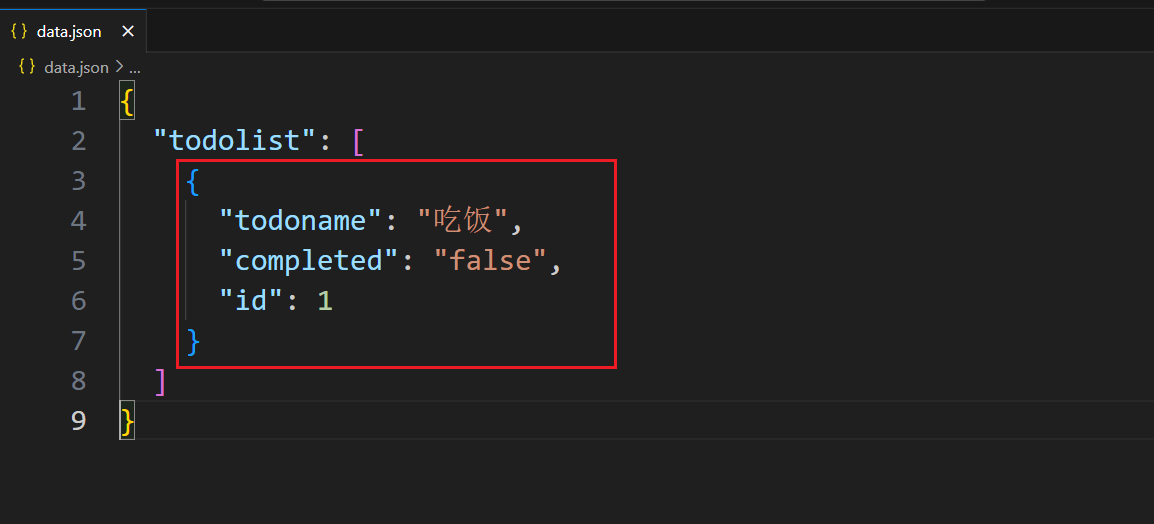
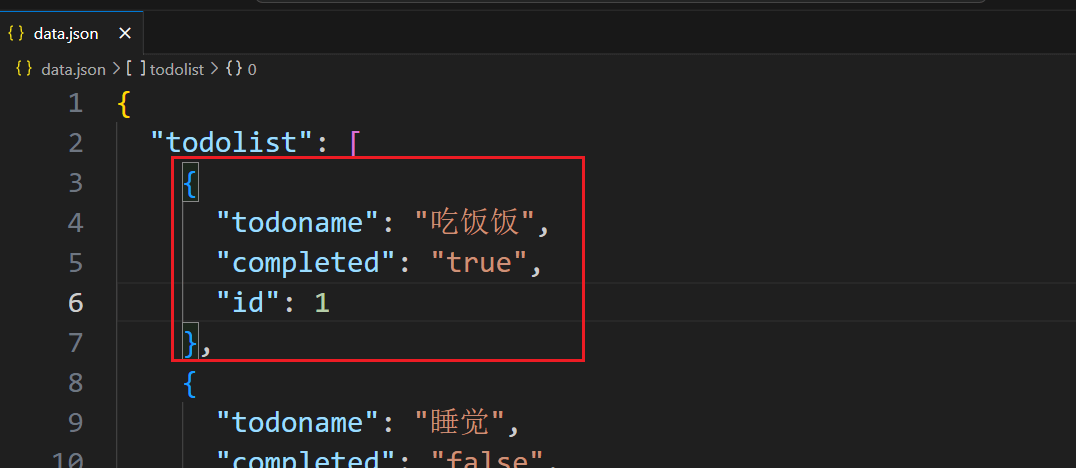
先创建data.json文件,其中必须是一个对象,一定要有一个键值对。
启动:

使用:
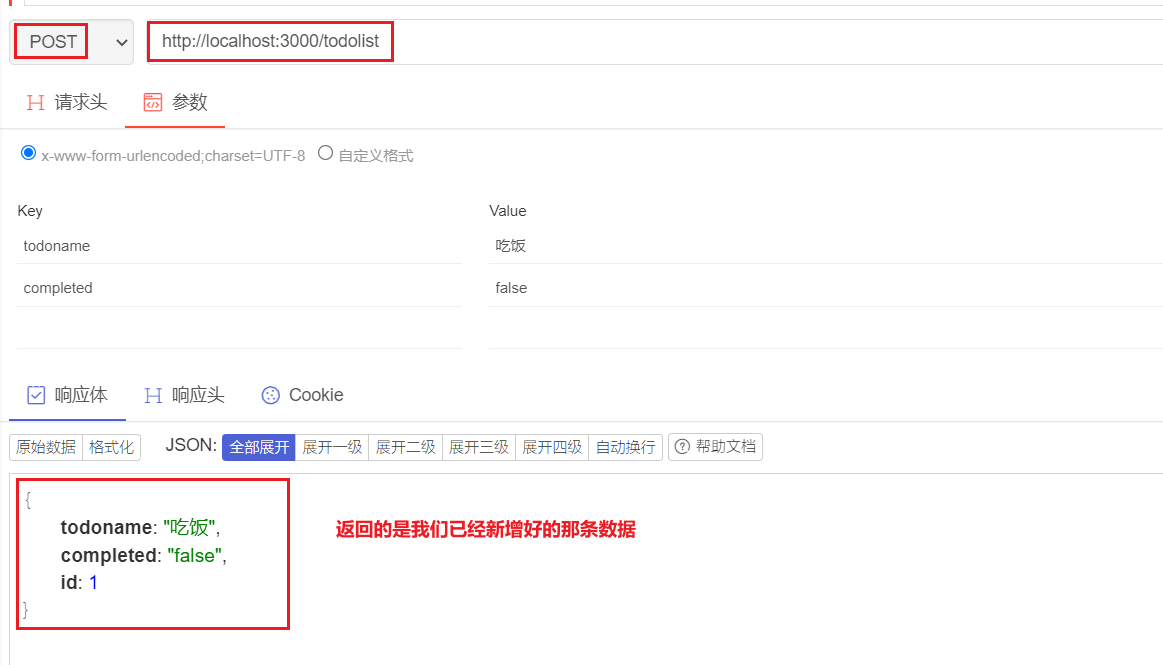
post请求 - 新增数据
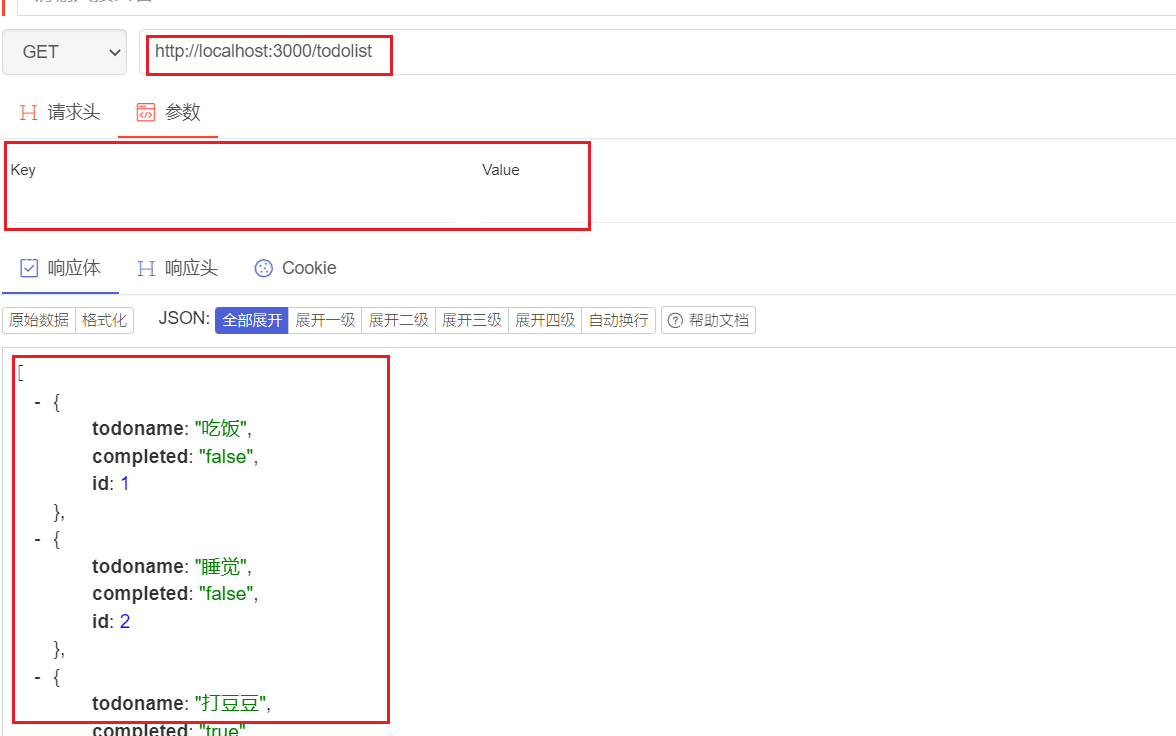
get请求 - 查询数据
查询所有数据
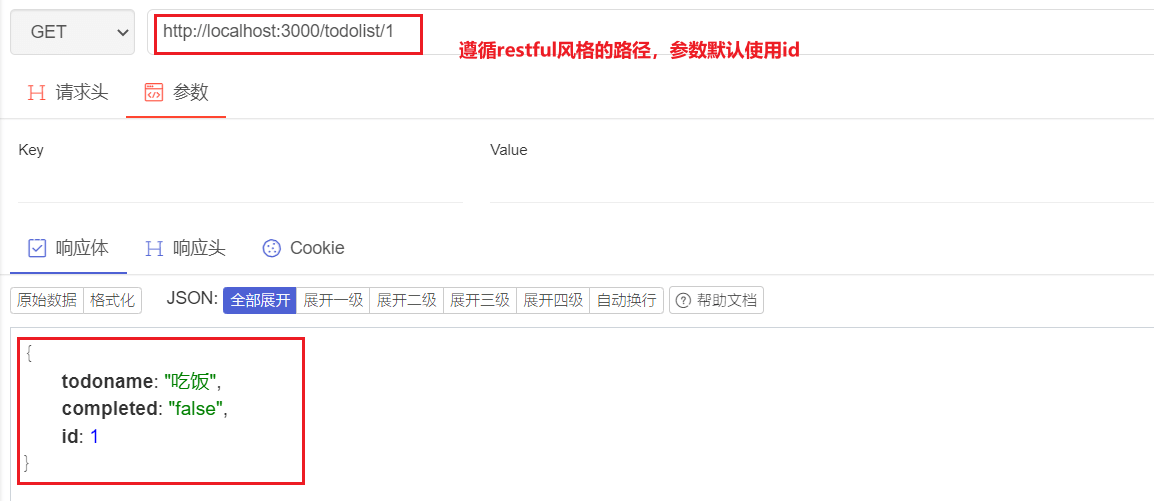
查询一条数据
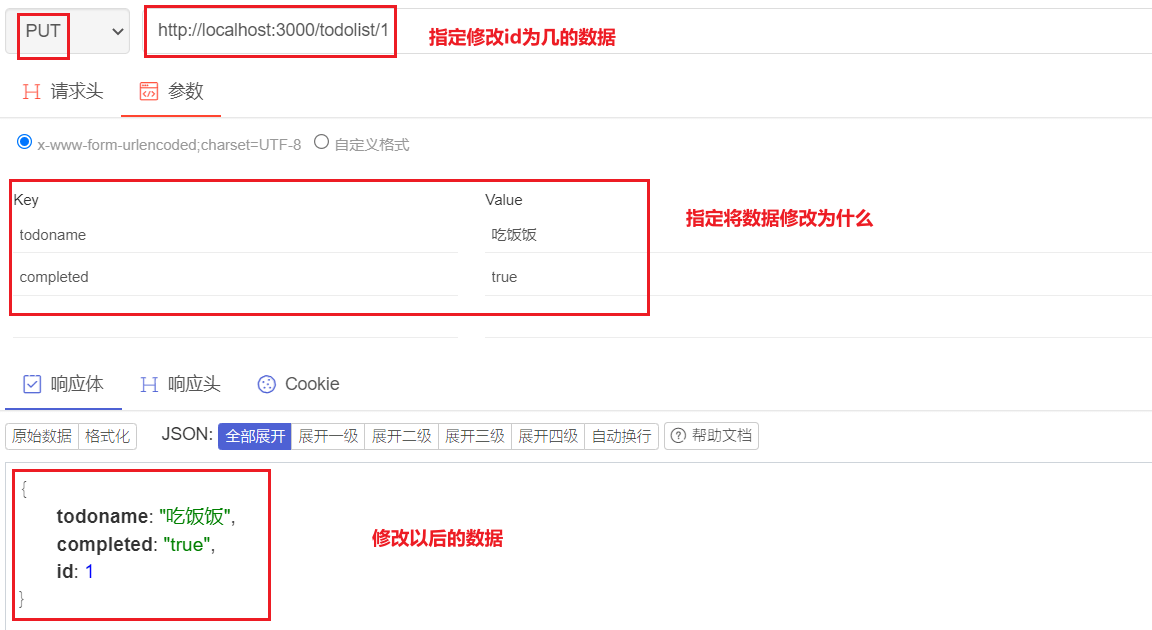
put请求 - 修改数据
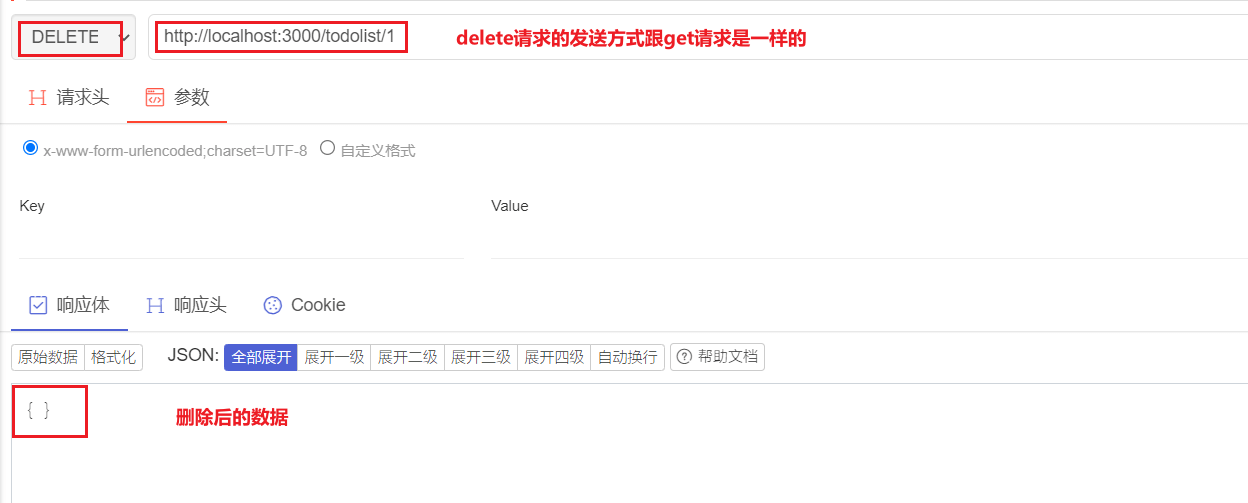
delete请求 - 删除数据
组件
概念
我们在项目开发中,通常是进行模块化开发的。在vue项目中,可以对整个页面进行模块化,组件就是页面中的一个模块。
我们将整个页面的一部分单独封装在一个页面中,当需要用到的时候,导入即可。
语法
全局组件
全局组件创建好以后,后续的每个vue实例都可以直接使用。
1
2
3
4
5
6
| Vue.component(组件名称, {
data() {
return {数据}
},
template: '组件的模板内容'
})
|
注意:组件中的数据,不能是data对象,必须是data函数返回的对象。
局部组件
局部组件创建好以后,只能在当前实例中使用,其他实例中无法使用。
1
2
3
4
5
6
7
8
9
10
11
12
| new Vue({
el: '',
data:{},
components: {
组件名称: {
data(){
return {}
},
template: `模板`
}
}
})
|
使用
将组件名称当做自定义标签使用。
1
2
| <hello></hello>
<hello />
|
单标签和双标签都可以。
案例:加载层。
事件修饰符native
当我们给自定义组件标签中绑定的时候,这个事件是没有办法触发,因为,这个自定义标签上绑定的事件,我们无法确定是父组件的事件还是子组件的事件。
如果细分析,我们会觉得这个事件应该属于父组件,因为如果是子组件的事件就应该写在子组件内部,而不应该写在父组件中了。
此时我们可以给事件加上native修饰符,这个事件就作为父组件的事件触发了。
1
2
3
4
5
6
7
8
9
10
11
12
13
14
15
16
17
18
19
20
21
22
23
24
25
26
27
28
29
30
| <body>
<div id="app">
<hello @click="fn"></hello>
<hello @click.native="fn"></hello>
</div>
</body>
<script src="./node_modules/vue/dist/vue.js"></script>
<script>
Vue.component('hello', {
template: `
<div>你好</div>
`,
methods: {
fn(){
console.log(222);
}
}
})
const vm = new Vue({
el: '#app',
data: {
},
methods: {
fn(){
console.log(111);
}
}
})
</script>
|
注意:native修饰符给普通标签是没有意义的,且会报错造成事件无法触发。
组件传值
父传子
父组件中的数据传递给子组件,也就是在子组件中使用父组件的数据。具体使用步骤如下:
- 在子组件自定义标签中,通过
v-bind指令添加自定义属性,值为父组件数据 - 在子组件实例中,通过
props属性,接收自定义属性中的数据 - 在子组件模板中,使用接收回来的数据,使用方式跟data中数据的使用方式一样
例:
1
2
3
4
5
6
7
8
9
10
11
12
13
14
15
16
17
18
19
20
21
22
23
24
25
26
27
28
29
30
31
32
33
| <body>
<div id="app">
<h1>{{title}}</h1>
<hello :fatherdata="title"></hello>
</div>
</body>
<script src="./node_modules/vue/dist/vue.js"></script>
<script>
Vue.component("hello", {
data(){
return {
msg: '子组件'
}
},
template: `
<div>
<h3>{{msg}}</h3>
<p>{{fatherdata}}</p>
</div>
`,
props: ['fatherdata']
})
new Vue({
el: '#app',
data: {
title: '父组件中的数据'
}
})
</script>
|
子组件实例中,使用props接收属性中数据的时候,除了有数组形式外,还可以有对象形式:
1
2
3
4
5
6
7
8
9
10
11
12
13
14
15
16
17
18
19
20
21
22
23
24
25
26
27
28
29
30
31
32
33
34
35
36
37
38
39
40
| <body>
<div id="app">
<h1>{{title}}</h1>
<hello :fatherdata="title"></hello>
</div>
</body>
<script src="./node_modules/vue/dist/vue.js"></script>
<script>
Vue.component("hello", {
data(){
return {
msg: '子组件'
}
},
template: `
<div>
<h3>{{msg}}</h3>
<p>{{fatherdata}}</p>
</div>
`,
props: {
fatherdata: {
type: String,
default: '哈哈'
}
}
})
new Vue({
el: '#app',
data: {
title: '父组件中的数据'
}
})
</script>
|
对象形式比较数组形式,可以限制类型,可以设置默认值,更加严谨,在使用的时候,如果组件是自己定义的,就没有必要限制类型和默认值,如果组件是别人定义的,就可以使用对象来限制。在实际开发中,我们通常会使用数组形式来接收数据,因为组件是自己定义的。
注意:父传子的数据是单向传送,也就是说子组件接收到父组件的数据,只能展示,不能对这个数据进行修改。
子传父
子组件的数据传递给父组件,步骤如下:
- 在子组件自定义标签上绑定自定义事件,事件函数为父组件的函数
- 在子组件实例中,调用$emit触发父组件给绑定的事件并传递参数(数据)
- 事件被触发后,父组件函数通过参数接收数据
1
2
3
4
5
6
7
8
9
10
11
12
13
14
15
16
17
18
19
20
21
22
23
24
25
26
27
28
29
30
31
32
33
34
35
36
37
38
39
40
41
42
43
44
45
| <body>
<div id="app">
<h1>{{title}}</h1>
<hello @send="getData"></hello>
</div>
</body>
<script src="./node_modules/vue/dist/vue.js"></script>
<script>
Vue.component("hello", {
data(){
return {
msg: '子组件'
}
},
template: `
<div>
<h3 @click="clickChild">{{msg}}</h3>
</div>
`,
methods: {
clickChild() {
this.$emit("send", this.msg)
}
}
})
new Vue({
el: '#app',
data: {
title: '父组件中的数据'
},
methods: {
getData(res){
console.log(res);
}
}
})
</script>
|
案例:todomvc组件版
非父子
非父子的两个组件要进行数据传递,需要通过这两个组件能共同访问到的全局组件进行。
vue提供了一个EventBus,是一个全局的vue实例,用来调控其他组件的数据交互。
实现步骤:
- 定义全局vue实例EventBus
- 接收数据的组件中,给EventBus通过$on方法绑定自定义事件,事件函数通过参数接收数据
- 传送数据的组件中,通过$emit触发EventBus的自定义事件,并传入参数(传递的数据)
例:
1
2
3
4
5
6
7
8
9
10
11
12
13
14
15
16
17
18
19
20
21
22
23
24
25
26
27
28
29
30
31
32
33
34
35
36
37
38
39
40
41
42
43
44
45
46
47
48
49
50
51
52
53
54
| <div id="app">
<h1>非父子传值</h1>
<!-- 组件jack -->
<jack></jack>
<!-- 组件rose -->
<rose></rose>
</div>
</body>
<script src="./node_modules/vue/dist/vue.js"></script>
<script>
const EventBus = new Vue()
Vue.component('jack', {
data(){
return {
msg: 'If you jump, I jump!'
}
},
template: `
<div>
<button @click="say">对Rose说</button>
</div>
`,
methods: {
say(){
EventBus.$emit('bus', this.msg)
}
}
})
Vue.component('rose', {
data(){
return {
info: 'Rose听到Jack说:'
}
},
template: `
<div>
<p>{{info}}</p>
</div>
`,
created(){
EventBus.$on('bus', res=>{
this.info += res
})
}
})
new Vue({
data:{
},
el: '#app'
})
</script>
|
案例:开关灯案例
ref
在vue中,标签的属性ref具有特殊含义,可以让父组件获取到子组件所有的信息。
例:
1
2
3
4
5
6
7
8
9
10
11
12
13
14
15
16
17
18
19
20
21
22
23
24
25
26
27
28
29
30
31
32
| <body>
<div id="app">
<h1 ref="title">父组件</h1>
<hello ref="child"></hello>
</div>
</body>
<script src="./node_modules/vue/dist/vue.js"></script>
<script>
Vue.component('hello', {
data(){
return {
msg: '子组件数据'
}
},
template: `
<div>
<p>{{msg}}</p>
</div>
`
})
new Vue({
el: '#app',
data:{},
mounted(){
console.log(this.$refs);
console.log(this.$refs.title);
console.log(this.$refs.child);
console.log(this.$refs.child.msg);
}
})
</script>
|
总结:
- 给标签添加ref属性,获取到的是这个标签的dom对象
- 给子组件添加ref属性,获取到的是这个子组件的实例对象,子组件中所有数据都在子组件实例对象上
应用:通常用在表单,父组件获取子组件表单元素数据
插槽
举例:游戏机的插槽上,插上不同的卡,就可以玩不同的游戏。
子组件中定义插槽,父组件给不同的内容,子组件就可以显示不同的内容。
匿名插槽
没有名字的插槽。
子组件通过slot标签,定义插槽,可以接收父组件给子组件自定义标签中放入的内容。
例:
1
2
3
4
5
6
7
8
9
10
11
12
13
14
15
16
17
18
19
20
21
22
| <body>
<div id="app">
<h2>父组件</h2>
<hr>
<child>
<h4>父组件给子组件放的内容</h4>
</child>
</div>
</body>
<script src="./node_modules/vue/dist/vue.js"></script>
<script>
Vue.component('child', {
template: `
<div>
<slot>默认内容</slot>
</div>
`
})
new Vue({
el: '#app',
})
</script>
|
父组件没有给子组件放内容的时候,就默认显示slot中的内容。
案例:只有内容的模态框
具名插槽
匿名插槽会将父组件给的内容放在同一个位置。
如果父组件给了多个内容,子组件要将多个内容放在不同位置的话,子组件就需要有多个插槽,为了识别多个插槽,每个插槽就需要有名字。
子组件定义插槽的时候,通过name属性,定义该插槽的名字。
父组件放内容的时候,通过slot属性的值,对应插槽的名字。
例:
1
2
3
4
5
6
7
8
9
10
11
12
13
14
15
16
17
18
19
20
21
22
23
24
| <body>
<div id="app">
<h2>父组件</h2>
<hr>
<child>
<h4 slot="title">第一个标题</h4>
<p slot="content">第一个提示内容</p>
</child>
</div>
</body>
<script src="./node_modules/vue/dist/vue.js"></script>
<script>
Vue.component('child', {
template: `
<div>
<slot name="title">默认标题</slot>
<slot name="content">默认内容</slot>
</div>
`
})
new Vue({
el: '#app',
})
</script>
|
案例:有标题有内容的模态框。
作用域插槽
含义:父组件对子组件的值进行加工处理。
作用域插槽不是父传子,而是子传父。通常是子组件将数据传给父组件,父组件接收到数据做处理。
使用步骤:
- 子组件的模板
template中,使用slot标签,在标签上通过一个自定义属性,将数据作为属性的值 - 在父组件的视图中,子组件对应的自定义标签中,添加一个标签,使用
slot-scope属性接收所有子组件绑定的数据。因为这个属性在子组件的自定义标签上,所以父组件的方法中是可以操作到这个数据的。
例:
1
2
3
4
5
6
7
8
9
10
11
12
13
14
15
16
17
18
19
20
21
22
23
24
25
26
27
28
29
30
31
32
33
34
35
| <body>
<div id="app">
<son>
<div slot-scope="data">
<p>{{data.aaa}}</p>
<h2>{{data.abc}}</h2>
</div>
</son>
</div>
</body>
<script>
Vue.component('son', {
data() {
return {
msg: '我是儿子',
smile: '嘿嘿'
}
},
template: `
<div class="box">
<slot :abc="msg" :aaa="smile"></slot>
</div>
`
})
new Vue({
el: '#app',
data: {
}
})
</script>
|
动态组件
含义:在一个位置,根据需求在多个组件中渲染其中一个。类似于tab切换
使用步骤:
- 多个组件中的一个放在一个位置,这个位置使用
component标签占位 component组件必须有一个v-bind:is属性,值为要展示的组件的名称
例:tab切换
1
2
3
4
5
6
7
8
9
10
11
12
13
14
15
16
17
18
19
20
21
22
23
24
25
26
27
28
29
30
31
32
33
34
35
36
37
38
39
40
41
42
43
44
| <body>
<div id="app">
<button @click="show(0)">主页</button>
<button @click="show(1)">列表页</button>
<button @click="show(2)">详情页</button>
<hr>
<component :is="com"></component>
</div>
</body>
<script src="./node_modules/vue/dist/vue.js"></script>
<script>
Vue.component('home', {
template: `
<div>
<h2>主页内容</h2>
</div>
`
})
Vue.component('list', {
template: `
<div>
<h2>列表页内容</h2>
</div>
`
})
Vue.component('detail', {
template: `
<div>
<h2>详情页内容</h2>
</div>
`
})
new Vue({
el: '#app',
data: {
coms: ['home', 'list', 'detail'],
com: 'home'
},
methods: {
show(index){
this.com = this.coms[index]
}
}
})
|
动态组件有缓存的特性,可以让动态组件不用频繁的创建和销毁。
正常的组件在展示和不展示之间,会有从创建到销毁的生命周期:
1
2
3
4
5
6
7
8
9
10
11
12
13
14
15
16
17
18
19
20
21
22
23
24
25
26
27
28
29
30
31
32
33
34
35
36
37
38
39
40
41
42
43
44
45
46
47
48
49
50
51
52
53
54
55
56
57
58
59
60
61
62
63
| <body>
<div id="app">
<button @click="show(0)">主页</button>
<button @click="show(1)">列表页</button>
<button @click="show(2)">详情页</button>
<hr>
<component :is="com"></component>
</div>
</body>
<script src="./node_modules/vue/dist/vue.js"></script>
<script>
Vue.component('home', {
template: `
<div>
<h2>主页内容</h2>
</div>
`,
created() {
console.log('home组件创建');
},
destroyed() {
console.log('home组件销毁');
}
})
Vue.component('list', {
template: `
<div>
<h2>列表页内容</h2>
</div>
`,
created() {
console.log('list组件创建');
},
destroyed() {
console.log('list组件销毁');
}
})
Vue.component('detail', {
template: `
<div>
<h2>详情页内容</h2>
</div>
`,
created() {
console.log('detail组件创建');
},
destroyed() {
console.log('detail组件销毁');
}
})
new Vue({
el: '#app',
data: {
coms: ['home', 'list', 'detail'],
com: 'home'
},
methods: {
show(index){
this.com = this.coms[index]
}
}
})
</script>
|
每次在切换组件的过程中,都会先触发当前展示的组件的created,然后触发上一个组件的destroyed。
在频繁的切换过程中,组件频繁的创建和销毁会影响到性能,所以vue给动态组件提供了指定了标签,可以让组件创建以后,不展示也可以不销毁,而是缓存到内存中,这个标签就是:keep-alive,例:
1
2
3
| <keep-alive>
<component :is="com"></component>
</keep-alive>
|
此时,组件在切换过程中,每个组件第一次展示都会触发created,但都不会触发destroyed。
vue提供了两个钩子函数,用来在进入每个缓存组件和离开缓存组件的时候,方便执行代码,这两个钩子函数是:activated和deactivated。
例:
1
2
3
4
5
6
7
8
9
10
11
12
13
14
15
16
17
18
19
20
21
22
23
24
25
26
27
28
29
30
31
32
33
34
35
36
37
38
39
40
41
42
43
44
45
46
47
48
49
50
51
52
53
54
55
56
57
58
59
60
61
62
63
64
65
66
67
68
69
70
71
72
73
74
75
76
77
78
79
80
81
82
83
| <body>
<div id="app">
<button @click="show(0)">主页</button>
<button @click="show(1)">列表页</button>
<button @click="show(2)">详情页</button>
<hr>
<keep-alive>
    <component :is="com"></component>
</keep-alive>
</div>
</body>
<script src="./node_modules/vue/dist/vue.js"></script>
<script>
Vue.component('home', {
template: `
<div>
<h2>主页内容</h2>
</div>
`,
created() {
console.log('home组件创建');
},
destroyed() {
console.log('home组件销毁');
},
activated(){
console.log('进入缓存的home组件');
},
deactivated(){
console.log('离开缓存的home组件');
}
})
Vue.component('list', {
template: `
<div>
<h2>列表页内容</h2>
</div>
`,
created() {
console.log('list组件创建');
},
destroyed() {
console.log('list组件销毁');
},
activated(){
console.log('进入缓存的list组件');
},
deactivated(){
console.log('离开缓存的list组件');
}
})
Vue.component('detail', {
template: `
<div>
<h2>详情页内容</h2>
</div>
`,
created() {
console.log('detail组件创建');
},
destroyed() {
console.log('detail组件销毁');
},
activated(){
console.log('进入缓存的detail组件');
},
deactivated(){
console.log('离开缓存的detail组件');
}
})
new Vue({
el: '#app',
data: {
coms: ['home', 'list', 'detail'],
com: 'home'
},
methods: {
show(index){
this.com = this.coms[index]
}
}
})
</script>
|
此时,我们可以从效果中,看到当activated和deactivated被触发时,destroyed就不会被触发了,也就是说,动态的销毁和缓存两中钩子函数是2选1的执行流程。
总结:
- 在动态组件中存在activated和deactivated两个生命周期的钩子函数,但这个函数需要
keep-alive标签支持。 - 有了
keep-alive以后,组件就不会被销毁了,而是被缓存起来了 - 缓存的两个生命周期函数和销毁的两个生命周期函数,必须是2选1的执行流程,要么是销毁,要么是缓存(取决于是否有keep-alive)
- 有了keep-alive以后,只有第一次加载组件会执行前4个生命周期函数,后续在切换过程中就不会执行前面4个生命周期函数了
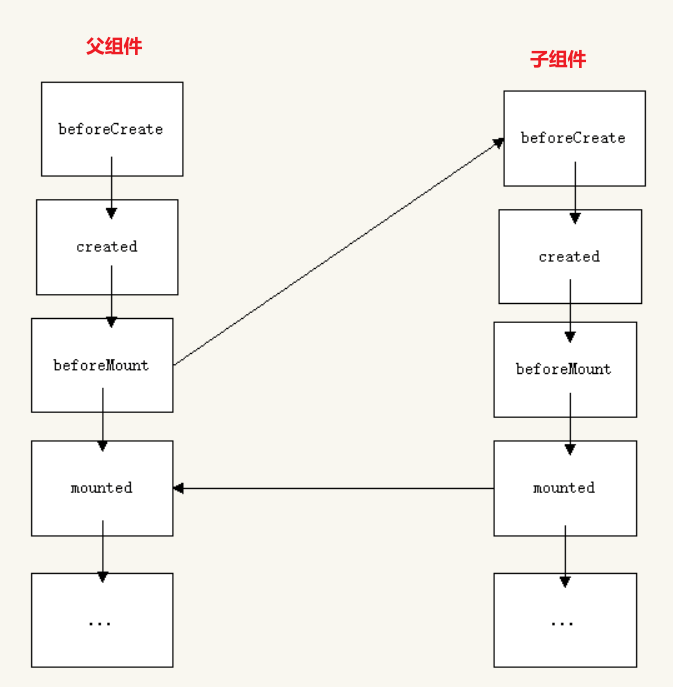
父子组件的生命周期

 微信
微信 支付宝
支付宝