React综合案例
一、概要
1、开发背景
因公司某项目的业务数据管理需要,公司决定安排开发人员组成项目小组,为该项目开发一个后台管理系统,实现该项目日常业务数据的展示和维护。
2、技术栈
使用react框架来完成本次项目的实现,采用前后端分离式开发,使用前端技术有如下一些:
react
react-router-dom
redux
react-redux
react-thunk
immutable
styled-components
antd
react-transition-group
axios
……
后端技术有:
3、开发环境
开发环境为:windows
开发工具:vscode + jsx插件 + eslint
开发调试工具:chrome浏览器
开发运行环境:node环境
上线环境为:linux + nginx + git
4、效果预览

5、项目初始化
a. 首先找个位置创建一下react项目,命令如下:
1
| npx create-react-app backend
|
b. 创建好项目后,进入项目目录先安装常规要使用的三方包,命令如下:
1
2
3
4
5
6
7
8
9
10
| npm i -S axios redux react-redux redux-thunk styled-components react-router-dom react-transition-group immutable redux-immutable
# axios:网络请求库
# redux:状态管理
# react-redux:redux功能增强的包
# redux-thunk:redux中间件(异步库)
# styled-components:css-in-js热门库
# react-router-dom:路由包
# react-transition-group:动画组件
# immutable:不可变数据实现
# redux-immutable:集成immutable到redux中的包
|
1
2
3
| npm i -D customize-cra react-app-rewired http-proxy-middleware
# react-app-rewired:默认情况下,我们是没有对于react项目的配置权的。使用了react-app-rewired之后,我们就可以获取到react项目中对于webpack的配置权。
# http-proxy-middleware:代理中间件,在vue中默认写好代理配置即可,在react中需要先安装三方的包,才能写代理配置。
|
c. 清理创建好的项目中不需要的文件及文件夹
- 删除
public目录下的全部内容 - 删除
src目录下的全部内容
d. 在public目录下放置一个项目图标文件并创建一个html入口文件,html文件内容大致如下
1
2
3
4
5
6
7
8
9
10
11
12
13
14
15
16
17
18
| <!DOCTYPE html>
<html>
<head>
<meta charset="utf-8" />
<meta http-equiv="X-UA-Compatible" content="IE=edge,chrome=1" />
<title>某知名网站后台管理系统</title>
<meta
name="viewport"
content="width=device-width,initial-scale=1,minimum-scale=1,maximum-scale=1,user-scalable=no"
/>
<link rel="icon" href="/favicon.ico" type="image/x-icon" />
<meta name="description" content="1000phone网站后台管理系统" />
<meta name="keywords" content="后台,管理,系统" />
</head>
<body>
<div id="root"></div>
</body>
</html>
|
e. 在src目录下创建根组件App.jsx与项目入口文件index.js
1
2
3
4
5
6
7
8
9
10
|
import React, { Component } from "react";
class App extends Component {
render() {
return <></>;
}
}
export default App;
|
1
2
3
4
5
6
7
8
9
10
11
12
|
import React from "react";
import ReactDOM from "react-dom";
import { BrowserRouter as Router } from "react-router-dom";
import App from "./App";
ReactDOM.render(
<Router>
<App />
</Router>,
document.getElementById("root")
);
|
f. 在当前项目根目录下面创建一个名称为config-overrides.js文件,对webpack进行配置(该配置方式不是对react内置配置进行直接修改,而是通过三方的包实现配置覆盖)
1
2
3
4
5
6
7
8
9
10
11
12
13
14
15
16
17
18
19
20
21
|
const {
override,
addDecoratorsLegacy,
disableEsLint,
addBundleVisualizer,
addWebpackAlias,
adjustWorkbox,
} = require("customize-cra");
const path = require("path");
module.exports = override(
disableEsLint(),
addWebpackAlias({
["@"]: path.resolve("./src"),
})
);
|
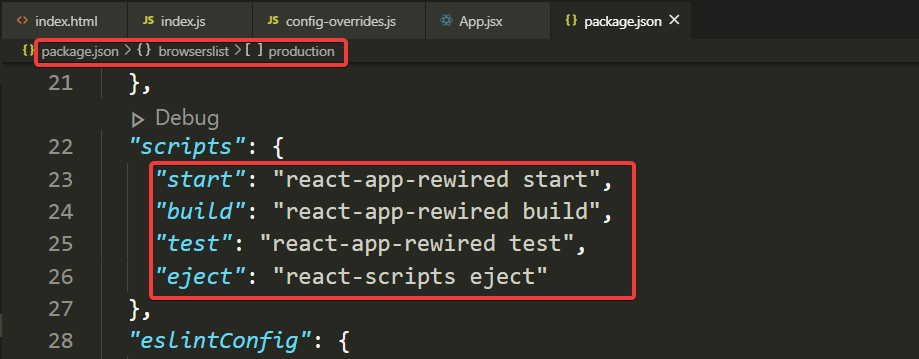
g. 修改package.json中的脚本命令为如下:
参考来源:https://www.npmjs.com/package/react-app-rewired
h. 在src目录下创建一个名称为setupProxy.js文件,提前为后续接口设置反向代理(如果需要的话)
与vue一样,代理操作仅限于本地开发环境,上线就失效了。
1
2
3
4
5
6
7
8
9
10
11
12
| const { createProxyMiddleware: proxy } = require("http-proxy-middleware");
module.exports = (app) => {
app.use(
"/api",
proxy({
target: "http://localhost:9000",
changeOrigin: true,
})
);
};
|
i. 建立src/下相关的目录,划分好目录结构(模块化)
- assets:存放静态资源的目录,后续可以房图片、css等文件
- components:封装组件存储的位置
- config:存放配置文件的目录
- hoc:存放高阶组件的文件
- models:存放模型文件
- router:存放路由文件
- services:存放封装一些文件(比如,axios封装)
- store:redux相关的目录
- views:视图组件存放目录
6、antd组件库
官网:https://ant.design/
面向企业级应用研发的 UI 设计语言与前端技术实现。
推荐使用 npm 或 yarn 的方式进行开发,不仅可在开发环境轻松调试,也可放心地在生产环境打包部署使用,享受整个生态圈和工具链带来的诸多好处。
如果你的电脑是使用npm进行项目包管理,请在项目中执行以下命令以在项目中安装ant design:
若使用的是yarn管理,则请运行以下命令:
在项目入口文件中引入antd的样式文件:
1
2
| import 'antd/dist/antd.css';
|
后续需要使用antd组件时,根据对应页面的引导使用即可。
二、登录开发
1、创建空组件
首先创建登录功能需要用的组件,该功能需要用到2个表单,为了便于维护,建议将俩个表单单独形成组件,加上一个大页面包裹,一共需要三个组件。
- 大组件:views/login/Index.jsx
- 普通登录组件:views/login/NormalLogin.jsx
- 短信登录组件:views/login/MobileLogin.jsx
为了有初步的预览效果,可以在组件中适当写一些内容填充使用。

2、组件封装
目前已知需要封装俩个组件:
- loading组件
- 封装的目的:antd自带的Spin组件虽然可以实现加载中,但是其位置不居中,在显示上很不友好,为了让路由懒加载能够有很好的用户体验,建议封装Loading组件
- 验证码组件
- 验证码在项目中一般会重复的使用,为了降低代码重复率,建议封装
封装的组件都放在components目录下:
- src/components/Loading.jsx
1
2
3
4
5
6
7
8
9
10
11
12
13
14
15
16
17
18
19
20
21
22
23
24
25
|
import React, { Component } from "react";
import styled from "styled-components";
import { Spin } from "antd";
class Loading extends Component {
render() {
return (
<Main>
<Spin tip="不要急,请稍等片刻..." size="large" />
</Main>
);
}
}
const Main = styled.div`
margin: 0 auto;
margin-bottom: 20px;
padding: 25% 50px;
text-align: center;
border-radius: 4px;
`;
export default Loading;
|
- src/components/Captcha.jsx
1
2
3
4
5
6
7
8
9
10
11
12
13
14
15
16
17
18
19
20
21
22
23
24
25
26
27
28
29
30
31
32
33
34
35
36
37
38
39
40
41
42
43
44
45
46
47
48
|
import React, { Component } from "react";
import axios from "axios";
class Captcha extends Component {
state = {
img: "",
};
render() {
return (
<div>
{/* 接收来自父组件的高度指定 */}
<img src={this.state.img} alt="captcha" height={this.props.height} onClick={this.loadCaptcha} />
</div>
);
}
componentDidMount() {
this.loadCaptcha();
}
loadCaptcha = () => {
axios.get("https://reactapi.iynn.cn/captcha/api/math").then((ret) => {
this.setState(() => {
return { img: ret.img };
});
this.props.setKey(ret.key);
});
};
}
export default Captcha;
|
3、路由规划
路由文件:router/index.js
在React中的路由懒加载:
- 需要导入react包中的俩个成员
- lazy,其是一个方法,负责去import对应的组件的
- Suspense:其是一个组件,负责去应用组件的以及可以制定懒加载时需要的提示组件
1
2
3
4
5
6
7
8
9
10
11
12
13
14
15
16
17
18
19
20
21
22
23
24
|
import { lazy, Suspense } from "react";
import { Route, Redirect, Switch } from "react-router-dom";
import Loading from "@/components/Loading";
const Login = lazy(() => import("@/views/login/Index"));
const Routes = () => {
return (
<Suspense fallback={<Loading />}>
<Switch>
<Route path="/login" component={Login}></Route>
<Redirect from="/" to="/login" />
</Switch>
</Suspense>
);
};
export default Routes;
|
在写好路由规则文件后,需要在App.jsx组件中应用所有的路由规则:
1
2
3
4
5
6
7
8
9
10
11
12
13
14
15
16
|
import React, { Component } from "react";
import Routes from "@/router/index";
class App extends Component {
render() {
return (
<>
<Routes />
</>
);
}
}
export default App;
|
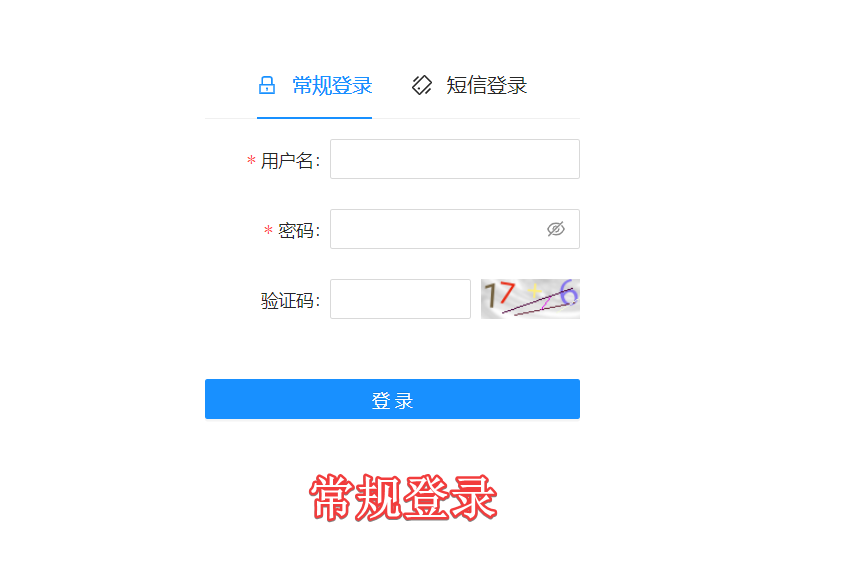
4、页面布局
编辑组件:src/views/login/Index.jsx
ant组件:https://ant.design/components/tabs-cn/
设计思路:使用tab选项卡的方式实现常规登录和短信登录的切换
1
2
3
4
5
6
7
8
9
10
11
12
13
14
15
16
17
18
19
20
21
22
23
24
25
26
27
28
29
30
31
32
33
34
35
36
37
38
39
40
41
42
43
44
45
46
47
48
49
50
51
52
53
|
import React, { Component } from "react";
import { Tabs } from "antd";
import { LockOutlined, ShakeOutlined } from "@ant-design/icons";
import NormalLogin from "./NormalLogin";
import MobileLogin from "./MobileLogin";
import styled from "styled-components";
const { TabPane } = Tabs;
const Main = styled.div`
margin: 0 auto;
width: 400px;
padding-top: 10%;
`;
class Index extends Component {
render() {
return (
<Main>
<Tabs defaultActiveKey="1" centered="true" size="large">
<TabPane
tab={
<span>
<LockOutlined />
常规登录
</span>
}
key="1"
>
{/* 调用常规登录的表单组件 */}
<NormalLogin />
</TabPane>
<TabPane
tab={
<span>
<ShakeOutlined />
短信登录
</span>
}
key="2"
>
{/* 调用手机登录的表单组件 */}
<MobileLogin />
</TabPane>
</Tabs>
</Main>
);
}
}
export default Index;
|
5、功能实现
5.1、常规登录
任务的拆解:
1
2
3
4
5
6
7
8
9
10
11
12
13
14
15
16
17
18
19
20
21
22
23
24
25
26
27
28
29
30
31
32
33
34
35
36
37
38
39
40
41
42
43
44
45
46
47
48
49
50
51
52
53
54
55
56
57
58
59
60
61
62
63
64
65
66
67
68
69
70
71
72
73
74
75
76
77
78
79
80
81
82
83
84
85
86
87
88
89
90
91
92
93
94
95
96
97
98
99
100
101
102
103
104
105
106
107
108
109
110
111
112
113
114
115
116
117
118
119
120
121
122
| import React, { Component, createRef } from "react";
import { Form, Input, Button, Row, Col } from "antd";
import Captcha from "@/components/Captcha";
const layout = {
labelCol: {
span: 8,
},
wrapperCol: {
span: 16,
},
};
const tailLayout = {
wrapperCol: {
offset: 4,
span: 20,
},
};
class NormalLogin extends Component {
constructor(props) {
super(props);
this.ref_captcha = createRef();
}
state = {
key: "",
};
render() {
return (
<div>
<Form
{...layout}
name="basic"
initialValues={{
remember: true,
}}
onFinish={this.onFinish}
onFinishFailed={this.onFinishFailed}
>
<Form.Item
label="用户名"
name="username"
rules={[
{
required: true,
message: "请输入用户名!",
},
]}
>
<Input />
</Form.Item>
<Form.Item
label="密码"
name="password"
rules={[
{
required: true,
message: "请输入密码!",
},
]}
>
<Input.Password />
</Form.Item>
<Form.Item label="验证码">
<Row gutter={8}>
<Col span={14}>
<Form.Item
name="captcha"
noStyle
rules={[
{
required: true,
message: "请输入验证码!",
},
]}
>
<Input />
</Form.Item>
</Col>
<Col span={10}>
{/* 放上验证码组件 */}
<Captcha height="31.6" setKey={this.setKey} ref={this.ref_captcha} />
</Col>
</Row>
</Form.Item>
<Form.Item {...tailLayout}>
{/* block:让按钮与其父元素一样宽 */}
<Button type="primary" htmlType="submit" block>
登录
</Button>
</Form.Item>
</Form>
</div>
);
}
onFinish = (values) => {
console.log("Success:", values);
};
onFinishFailed = (errorInfo) => {
console.log("Failed:", errorInfo);
};
setKey = (key) => {
this.setState(() => {
return {
key,
};
});
};
}
export default NormalLogin;
|
在首次编写网络请求前,需要对地址、axios等进行封装,封装好再去进行网络请求以及其业务逻辑部分的实现。
①封装地址配置文件:src/config/url.js
1
2
3
4
5
6
7
8
9
|
let baseUrl = "https://reactapi.iynn.cn";
export const NORMAL_LOGIN = baseUrl + "/api/common/auth/login";
export const MOBILE_LOGIN = baseUrl + "/api/common/auth/mobile";
|
②封装axios配置文件:src/services/http.js
1
2
3
4
5
6
7
8
9
10
11
12
13
14
15
16
17
18
19
20
21
22
23
24
25
26
27
|
import axios from "axios";
axios.interceptors.request.use((cfg) => {
let jwt = localStorage.getItem("jwt");
if (jwt) {
cfg.headers.Authorization = jwt;
}
return cfg;
});
axios.interceptors.response.use((ret) => {
if (ret.data.context && ret.data.context.jwt) {
localStorage.setItem("jwt", ret.data.context.jwt);
}
return ret.data || ret;
});
export default axios;
|
③封装模型文件:src/models/common.js
模型是干啥的??
目的/作用:将对于请求的数据的处理以及请求放到一起,这样显得组件代码更加干净!
1
2
3
4
5
6
7
8
9
10
11
12
13
14
15
|
import req from "@/services/http";
import { NORMAL_LOGIN, MOBILE_LOGIN } from "@/config/url";
const model = {
normalLogin(obj) {
return req.post(NORMAL_LOGIN, obj);
},
};
export default model;
|
④实现需要的登录业务需求
1
2
3
4
5
6
7
8
9
10
11
12
13
14
15
16
17
18
19
20
21
22
23
24
25
26
27
28
29
30
31
32
33
34
35
36
37
38
39
40
41
42
43
44
45
46
47
48
49
50
51
52
53
54
55
56
57
58
59
60
61
62
63
64
65
66
67
68
69
70
71
72
73
74
75
76
77
78
79
80
81
82
83
84
85
86
87
88
89
90
91
92
93
94
95
96
97
98
99
100
101
102
103
104
105
106
107
108
109
110
111
112
113
114
115
116
117
118
119
120
121
122
123
124
125
126
127
128
129
130
131
132
133
134
135
136
137
138
139
140
141
142
| import React, { Component, createRef } from "react";
import { Form, Input, Button, Row, Col, message } from "antd";
import { withRouter } from "react-router-dom";
import Captcha from "@/components/Captcha";
import Model from "@/models/common";
const layout = {
labelCol: {
span: 8,
},
wrapperCol: {
span: 16,
},
};
const tailLayout = {
wrapperCol: {
offset: 4,
span: 20,
},
};
class NormalLogin extends Component {
constructor(props) {
super(props);
this.ref_captcha = createRef();
}
state = {
key: "",
};
render() {
return (
<div>
<Form
{...layout}
name="basic"
initialValues={{
remember: true,
}}
onFinish={this.onFinish}
onFinishFailed={this.onFinishFailed}
>
<Form.Item
label="用户名"
name="username"
rules={[
{
required: true,
message: "请输入用户名!",
},
]}
>
<Input />
</Form.Item>
<Form.Item
label="密码"
name="password"
rules={[
{
required: true,
message: "请输入密码!",
},
]}
>
<Input.Password />
</Form.Item>
<Form.Item label="验证码">
<Row gutter={8}>
<Col span={14}>
<Form.Item
name="captcha"
noStyle
rules={[
{
required: true,
message: "请输入验证码!",
},
]}
>
<Input />
</Form.Item>
</Col>
<Col span={10}>
{/* 放上验证码组件 */}
<Captcha height="31.6" setKey={this.setKey} ref={this.ref_captcha} />
</Col>
</Row>
</Form.Item>
<Form.Item {...tailLayout}>
{/* block:让按钮与其父元素一样宽 */}
<Button type="primary" htmlType="submit" block>
登录
</Button>
</Form.Item>
</Form>
</div>
);
}
onFinish = (values) => {
values["key"] = this.state.key;
Model.normalLogin(values).then((ret) => {
if (ret.errNo === 0) {
message.success(ret.message, 2, () => {
this.props.history.push("/dashboard");
});
} else {
message.error(ret.errText);
this.ref_captcha.current.loadCaptcha();
}
});
};
onFinishFailed = (errorInfo) => {
console.log("Failed:", errorInfo);
};
setKey = (key) => {
this.setState(() => {
return {
key,
};
});
};
}
export default withRouter(NormalLogin);
|
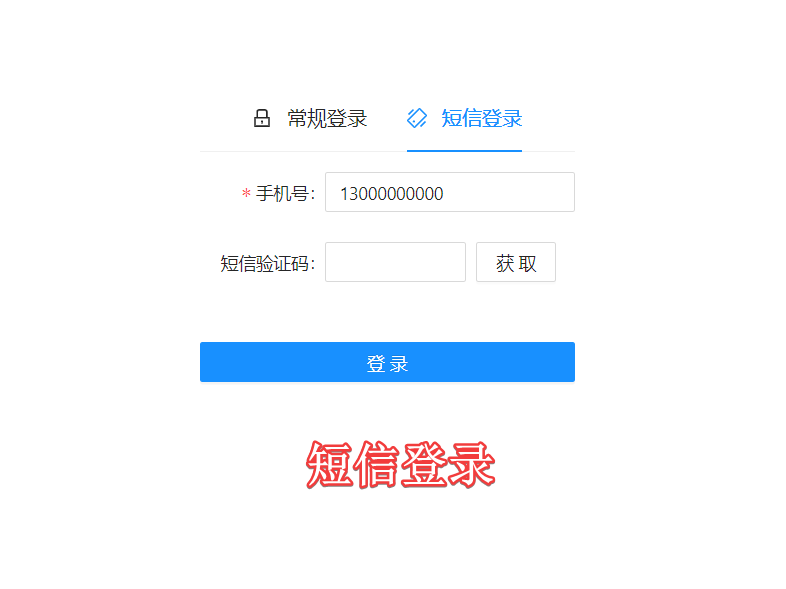
5.2、短信登录
步骤分解:
- 处理大的表单,展示手机号、验证码表单项
- 在点击“获取”按钮的时候弹出模态窗口来显示图形验证码
- 在用户输入正确的验证码后(获取到一个用于请求短信验证码的token)才能允许用户点击“获取”按钮来获取短信验证码
- 输入短信验证码后再按“登录”按钮进行登录验证(传递requestId给服务器)
依次需要使用的接口:
- 获取图形验证码
- 验证图形验证码
- 获取短信验证码
- 手机号登录接口
a. 在url封装的文件中声明接口需要使用的地址
1
2
3
4
|
export const VERIFY_CAPTCHA = baseUrl + "/api/common/captcha/verify";
export const GET_SMS_CODE = baseUrl + "/api/common/sms/send";
|
b. 在模型文件models/common.js中增加两个模型方法
1
2
3
4
5
6
7
8
9
10
11
12
13
|
verifyCpt(obj) {
return req.post(VERIFY_CAPTCHA, obj);
},
getCode(obj) {
return req.post(GET_SMS_CODE, obj);
},
mobileLogin(obj) {
return req.post(MOBILE_LOGIN, obj);
},
|
完整的组件代码:
1
2
3
4
5
6
7
8
9
10
11
12
13
14
15
16
17
18
19
20
21
22
23
24
25
26
27
28
29
30
31
32
33
34
35
36
37
38
39
40
41
42
43
44
45
46
47
48
49
50
51
52
53
54
55
56
57
58
59
60
61
62
63
64
65
66
67
68
69
70
71
72
73
74
75
76
77
78
79
80
81
82
83
84
85
86
87
88
89
90
91
92
93
94
95
96
97
98
99
100
101
102
103
104
105
106
107
108
109
110
111
112
113
114
115
116
117
118
119
120
121
122
123
124
125
126
127
128
129
130
131
132
133
134
135
136
137
138
139
140
141
142
143
144
145
146
147
148
149
150
151
152
153
154
155
156
157
158
159
160
161
162
163
164
165
166
167
168
169
170
171
172
173
174
175
176
177
178
179
180
181
182
183
184
185
186
187
188
189
190
191
192
193
194
195
196
197
198
199
200
201
202
203
204
205
206
207
208
209
210
211
212
213
214
215
216
217
218
219
220
221
222
223
224
225
226
227
228
229
230
231
232
233
234
235
236
237
238
239
240
241
242
243
244
245
246
247
248
249
250
251
252
253
254
255
256
257
258
259
260
261
262
263
264
265
266
267
268
269
270
271
272
273
274
275
276
| import React, { Component, createRef } from "react";
import { Form, Input, Button, Col, Row, Modal, message } from "antd";
import { withRouter } from "react-router-dom";
import Captcha from "@/components/Captcha";
import Model from "@/models/common";
const layout = {
labelCol: {
span: 8,
},
wrapperCol: {
span: 16,
},
};
const tailLayout = {
wrapperCol: {
offset: 0,
span: 24,
},
};
class MobileLogin extends Component {
constructor(props) {
super(props);
this.ref_cpt = createRef();
this.ref_captcha = createRef();
this.ref_mobile = createRef();
}
state = {
key: "",
token: "",
expire: 0,
isModalVisible: false,
requestId: "",
count: 60,
can: true,
};
render() {
return (
<div>
<Form
{...layout}
name="basic"
initialValues={{
remember: true,
}}
onFinish={this.onFinish}
onFinishFailed={this.onFinishFailed}
>
<Form.Item
label="手机号"
name="mobile"
rules={[
{
required: true,
message: "请输入手机号!",
},
]}
>
<Input ref={this.ref_mobile} />
</Form.Item>
<Form.Item label="短信验证码">
<Row gutter={8}>
<Col span={14}>
<Form.Item
name="code"
noStyle
rules={[
{
required: true,
message: "请输入短信验证码!",
},
]}
>
<Input />
</Form.Item>
</Col>
<Col span={10}>
{/* block:让按钮与父元素宽度一样 */}
<Button block onClick={this.getCode}>
{this.state.can ? "获取短信" : this.state.count + "秒后获取"}
</Button>
</Col>
</Row>
</Form.Item>
<Form.Item {...tailLayout}>
<Button type="primary" htmlType="submit" block>
登录
</Button>
</Form.Item>
</Form>
{/* 模态窗口用一阶段的话来讲,其就是一个弹出的div,不用非得放在Form组件里面 */}
<Modal title="验证码" visible={this.state.isModalVisible} onOk={this.handleOk} onCancel={this.handleCancel} okText="确定" cancelText="取消">
<Form>
<Form.Item label="验证码">
<Row gutter={8}>
<Col span={14}>
<Form.Item
name="captcha"
noStyle
rules={[
{
required: true,
message: "请输入验证码!",
},
]}
>
<Input ref={this.ref_cpt} />
</Form.Item>
</Col>
<Col span={10}>
{/* 放上验证码组件 */}
<Captcha height="31.6" setKey={this.setKey} ref={this.ref_captcha} />
</Col>
</Row>
</Form.Item>
</Form>
</Modal>
</div>
);
}
onFinish = (values) => {
values["requestId"] = this.state.requestId;
Model.mobileLogin(values).then((ret) => {
if (ret.errNo === 0) {
message.success(ret.message, 2, () => {
this.props.history.push("/dashboard");
});
} else {
message.error(ret.errText);
}
});
};
onFinishFailed = (errorInfo) => {
console.log("Failed:", errorInfo);
};
getCode = () => {
let mobile = this.ref_mobile.current.props.value;
if (/^1[3-9]\d{9}$/.test(mobile)) {
if (this.state.can) {
this.showModal(true);
}
} else {
message.error("请输入正确的手机号");
}
};
countDown = () => {
if (this.state.count === 1) {
this.setState(() => {
return {
count: 60,
can: true,
};
});
} else {
this.setState((state) => {
return {
count: state.count - 1,
};
});
setTimeout(() => {
this.countDown();
}, 1000);
}
};
showModal = (flag) => {
this.setState(() => {
return {
isModalVisible: flag,
};
});
};
handleOk = () => {
let values = {};
let mobile = this.ref_mobile.current.props.value;
values["captcha"] = this.ref_cpt.current.props.value;
values["key"] = this.state.key;
Model.verifyCpt(values).then((ret) => {
if (ret.errNo === 0) {
message.success(ret.message, 2, () => {
this.setState(
() => {
return {
token: ret.context.token,
expire: ret.context.expire,
};
},
() => {
this.showModal(false);
let data = {};
data["token"] = this.state.token;
data["mobile"] = mobile;
data["type"] = 0;
Model.getCode(data).then((ret) => {
if (ret.errNo === 0) {
this.setState(() => {
return { can: false };
});
this.countDown();
message.success(ret.message, 2, () => {
this.setState(() => {
return {
requestId: ret.requestId,
};
});
});
} else {
message.error(ret.errText);
}
});
}
);
});
} else {
message.error(ret.errText);
this.ref_captcha.current.loadCaptcha();
}
});
};
handleCancel = () => {
this.showModal(false);
};
setKey = (key) => {
this.setState(() => {
return { key };
});
};
}
export default withRouter(MobileLogin);
|
三、后台开发
1、后台首页
1.1、防翻墙
①创建后台首页组件和路由
组件:src/views/dashboard/Index.jsx
修改完路由规则后,最新的路由规则如下:
1
2
3
4
5
6
7
8
9
10
11
12
13
14
15
16
17
18
19
20
21
22
23
24
25
26
|
import { lazy, Suspense } from "react";
import { Route, Redirect, Switch } from "react-router-dom";
import Loading from "@/components/Loading";
const Login = lazy(() => import("@/views/login/Index"));
const Dashboard = lazy(() => import("@/views/dashboard/Index"));
const Routes = () => {
return (
<Suspense fallback={<Loading />}>
<Switch>
<Route path="/login" component={Login}></Route>
<Route path="/dashboard" component={Dashboard}></Route>
<Redirect from="/" to="/login" />
</Switch>
</Suspense>
);
};
export default Routes;
|
②怎么样去防止翻墙(难点)
原因:在react中没有类似于vue的路由守卫,如果需要实现对应的效果,则需要手动配置。
利用的知识点:HOC
a. 编写高阶组件
先在地址配置文件中添加jwt预检地址配置:
1
2
|
export const JWT_PRE_CHECK = baseUrl + "/api/common/auth/jwtPreCheck";
|
在模型中添加请求方法:
1
2
3
4
|
checkJWT() {
return req.get(JWT_PRE_CHECK);
},
|
1
2
3
4
5
6
7
8
9
10
11
12
13
14
15
16
17
18
19
20
21
22
23
24
25
26
27
28
29
30
31
32
33
34
35
36
37
38
39
40
41
42
43
44
45
46
47
48
49
50
51
52
53
54
55
56
57
58
59
60
61
62
|
import React, { Component } from "react";
import { Redirect } from "react-router-dom";
import Model from "@/models/common";
function CheckLogin(Cmp) {
return class Hoc extends Component {
state = {
isLogin: false,
isFinish: false,
};
render() {
return <>{this.state.isFinish ? this.state.isLogin ? <Cmp {...this.props} /> : <Redirect to="/login" /> : <div />}</>;
}
componentDidMount() {
let jwt = localStorage.getItem("jwt");
if (jwt) {
Model.checkJWT().then((ret) => {
if (ret.errNo === 0) {
this.setState(() => {
return {
isLogin: true,
isFinish: true,
};
});
} else {
this.setState(() => {
return {
isLogin: false,
isFinish: true,
};
});
}
});
} else {
console.log("没有登录");
this.setState(() => {
return {
isFinish: true,
};
});
}
}
};
}
export default CheckLogin;
|
b. 在需要登录才能访问的组件中去使用hoc
1
2
3
4
5
6
7
8
9
10
|
import React, { Component } from "react";
import CheckLogin from "@/hoc/CheckLogin";
class Index extends Component {
render() {
return <div>后台首页</div>;
}
}
export default CheckLogin(Index);
|
1.2、后台布局
a. 先在地址配置文件src/config/url.js中配置获取管理员信息的地址
1
2
|
export const GET_ADMIN_INFO = baseUrl + "/api/common/auth/adminInfo";
|
b. 在模型文件src/models/common.js中新增获取管理员信息的方法
1
2
3
| getAdminInfo() {
return req.get(GET_ADMIN_INFO);
},
|
c. 编写后台首页的布局及数据的获取
组件:src/views/dashboard/Index.jsx
1
2
3
4
5
6
7
8
9
10
11
12
13
14
15
16
17
18
19
20
21
22
23
24
25
26
27
28
29
30
31
32
33
34
35
36
37
38
39
40
41
42
43
44
45
46
47
48
49
50
51
52
53
54
55
56
57
58
59
60
61
62
63
64
65
66
67
68
69
70
71
72
73
74
75
76
77
78
79
80
81
82
83
84
85
86
| import React, { Component } from "react";
import CheckLogin from "@/hoc/CheckLogin";
import { Layout, Menu } from "antd";
import { MenuUnfoldOutlined, MenuFoldOutlined, UserOutlined, VideoCameraOutlined, UploadOutlined } from "@ant-design/icons";
import "@/assets/css/layout.css";
import logo from "@/assets/images/logo.png";
import miniLogo from "@/assets/images/favicon.ico";
import Model from "@/models/common";
const { Header, Sider, Content } = Layout;
class Index extends Component {
state = {
collapsed: false,
admininfo: { last_login_addr: {} },
};
toggle = () => {
this.setState({
collapsed: !this.state.collapsed,
});
};
render() {
return (
<Layout style={{ height: "100%" }}>
<Sider trigger={null} collapsible collapsed={this.state.collapsed}>
{/* 通过动态的方式来控制logo的显示 */}
<div className="logo">{this.state.collapsed ? <img src={miniLogo} /> : <img src={logo} />}</div>
<Menu theme="dark" mode="inline" defaultSelectedKeys={["1"]}>
<Menu.Item key="1" icon={<UserOutlined />}>
用户管理
</Menu.Item>
<Menu.Item key="2" icon={<VideoCameraOutlined />}>
视频管理
</Menu.Item>
<Menu.Item key="3" icon={<UploadOutlined />}>
上传管理
</Menu.Item>
</Menu>
</Sider>
<Layout className="site-layout">
<Header className="site-layout-background" style={{ padding: "5 5" }}>
{React.createElement(this.state.collapsed ? MenuUnfoldOutlined : MenuFoldOutlined, {
className: "trigger",
onClick: this.toggle,
})}
<span>
{" "}
欢迎您:{this.state.admininfo.username}!您上次登录于
{" " + this.state.admininfo.last_login_addr.state + " " + this.state.admininfo.last_login_addr.isp}(
{this.state.admininfo.last_ip})
</span>
</Header>
<Content
className="site-layout-background"
style={{
margin: "24px 16px",
padding: 24,
minHeight: 280,
}}
>
<div>欢迎使用xxx项目后台管理系统!</div>
</Content>
</Layout>
</Layout>
);
}
componentDidMount() {
Model.getAdminInfo().then((ret) => {
this.setState(() => {
return {
admininfo: ret.accountInfo,
};
});
});
}
}
export default CheckLogin(Index);
|
2、用户模块
2.1、用户列表
步骤:
a. 创建出需要使用的组件及其路由,确保组件在路由规则匹配的情况下展示没有问题;
新建的路由规则文件src/router/nest.js
1
2
3
4
5
6
7
8
9
10
11
12
13
14
15
16
17
18
19
20
21
22
23
24
|
import { lazy, Suspense } from "react";
import { Route, Redirect, Switch } from "react-router-dom";
import Loading from "@/components/Loading";
const UserList = lazy(() => import("@/views/dashboard/users/Index"));
const Routes = () => {
return (
<Suspense fallback={<Loading />}>
<Switch>
<Route path="/dashboard/users" component={UserList} />
</Switch>
</Suspense>
);
};
export default Routes;
|
将该路由规则文件放到指定的地方去应用(src/dashboard/Index.jsx):

再去编写改变菜单的处理程序:
1
2
3
4
5
6
7
8
|
changeMenu = (obj) => {
if (obj.key === "1") {
this.props.history.push("/dashboard/users");
}
};
|
b. 获取组件需要的展示表格的数据;
在排组件的时候需要注意,table组件自带分页器的,但是这个分页器是前端分页的实现,需要使用后端分页,自行去找ant中的单独的分页器。
先在地址配置文件中定义地址:
1
2
|
export const GET_USER_LIST = baseUrl + "/api/users";
|
创建新的模型文件src/models/users.js,定义模型方法:
1
2
3
4
5
6
7
8
9
10
11
12
13
14
15
16
17
18
|
import req from "@/services/http";
import { GET_USER_LIST } from "@/config/url";
const model = {
getUserList(obj) {
return req.get(GET_USER_LIST, {
params: obj,
});
},
};
export default model;
|
最终请求数据,展示数据。
c. 利用获取到的数据展示在表格中(结合分页实现)
ant支持国际化,默认使用的英文,如果需要切换语言,例如切换成中文显示,则可以参考:https://ant.design/components/config-provider-cn/index.js,文件中的写法:
1
2
3
4
5
6
7
8
9
10
11
12
13
14
15
16
17
18
19
|
import React from "react";
import ReactDOM from "react-dom";
import { BrowserRouter as Router } from "react-router-dom";
import App from "./App";
import "antd/dist/antd.css";
import { ConfigProvider } from "antd";
import zhCN from "antd/lib/locale/zh_CN";
ReactDOM.render(
<ConfigProvider locale={zhCN}>
<Router>
<App />
</Router>
</ConfigProvider>,
document.getElementById("root")
);
|
完整的组件(src/views/dashboard/users/Index.js)代码:
1
2
3
4
5
6
7
8
9
10
11
12
13
14
15
16
17
18
19
20
21
22
23
24
25
26
27
28
29
30
31
32
33
34
35
36
37
38
39
40
41
42
43
44
45
46
47
48
49
50
51
52
53
54
55
56
57
58
59
60
61
62
63
64
65
66
67
68
69
70
71
72
73
74
75
76
77
78
79
80
81
82
83
84
85
86
87
88
89
90
91
92
93
94
95
96
97
98
99
100
101
102
103
104
105
106
107
108
109
110
111
112
113
114
115
116
117
118
119
120
121
122
123
124
125
126
127
128
|
import React, { Component } from "react";
import { PageHeader, Button, Table, Tag, Space, Pagination } from "antd";
import Model from "@/models/users";
class Index extends Component {
state = {
paginate: {},
page: 1,
keyword: "",
};
columns = [
{
title: "ID",
dataIndex: "id",
key: "id",
},
{
title: "用户名",
dataIndex: "username",
key: "username",
},
{
title: "邮箱",
dataIndex: "email",
key: "email",
},
{
title: "性别",
dataIndex: "gender",
key: "gender",
render: (gender) => {
switch (gender) {
case "1":
return "男";
case "2":
return "女";
default:
return "保密";
}
},
},
{
title: "状态",
key: "status",
dataIndex: "status",
render: (status) => <>{status === "1" ? <Tag color="green">正常</Tag> : <Tag color="red">禁用</Tag>}</>,
},
{
title: "操作",
key: "action",
render: (text, record) => (
<Space size="middle">
<a>编辑</a>
<a>删除</a>
</Space>
),
},
];
render() {
return (
<div>
{/* 页面头部 */}
<PageHeader
ghost={false}
title="用户管理"
subTitle="这是用户管理模块,当前实现的功能是用户列表!"
extra={[
<Button key="2">统计数据</Button>,
<Button key="1" type="primary">
新增
</Button>,
]}
></PageHeader>
{/* 表格 */}
<Table columns={this.columns} dataSource={this.state.paginate.data} pagination={false} rowKey={(row) => row.id} />
{/* 后台分页实现 */}
<div style={{ marginTop: "20px", textAlign: "center" }}>
<Pagination defaultCurrent={this.state.page} total={this.state.paginate.total} onChange={this.changePage} showSizeChanger={false} />
</div>
</div>
);
}
componentDidMount() {
this.loadData();
}
loadData = () => {
let obj = {
keyword: this.state.keyword,
page: this.state.page,
};
Model.getUserList(obj).then((ret) => {
this.setState(() => {
return {
paginate: ret.paginate,
};
});
});
};
changePage = (page, pageSize) => {
this.setState(
() => {
return { page };
},
() => this.loadData()
);
};
}
export default Index;
|
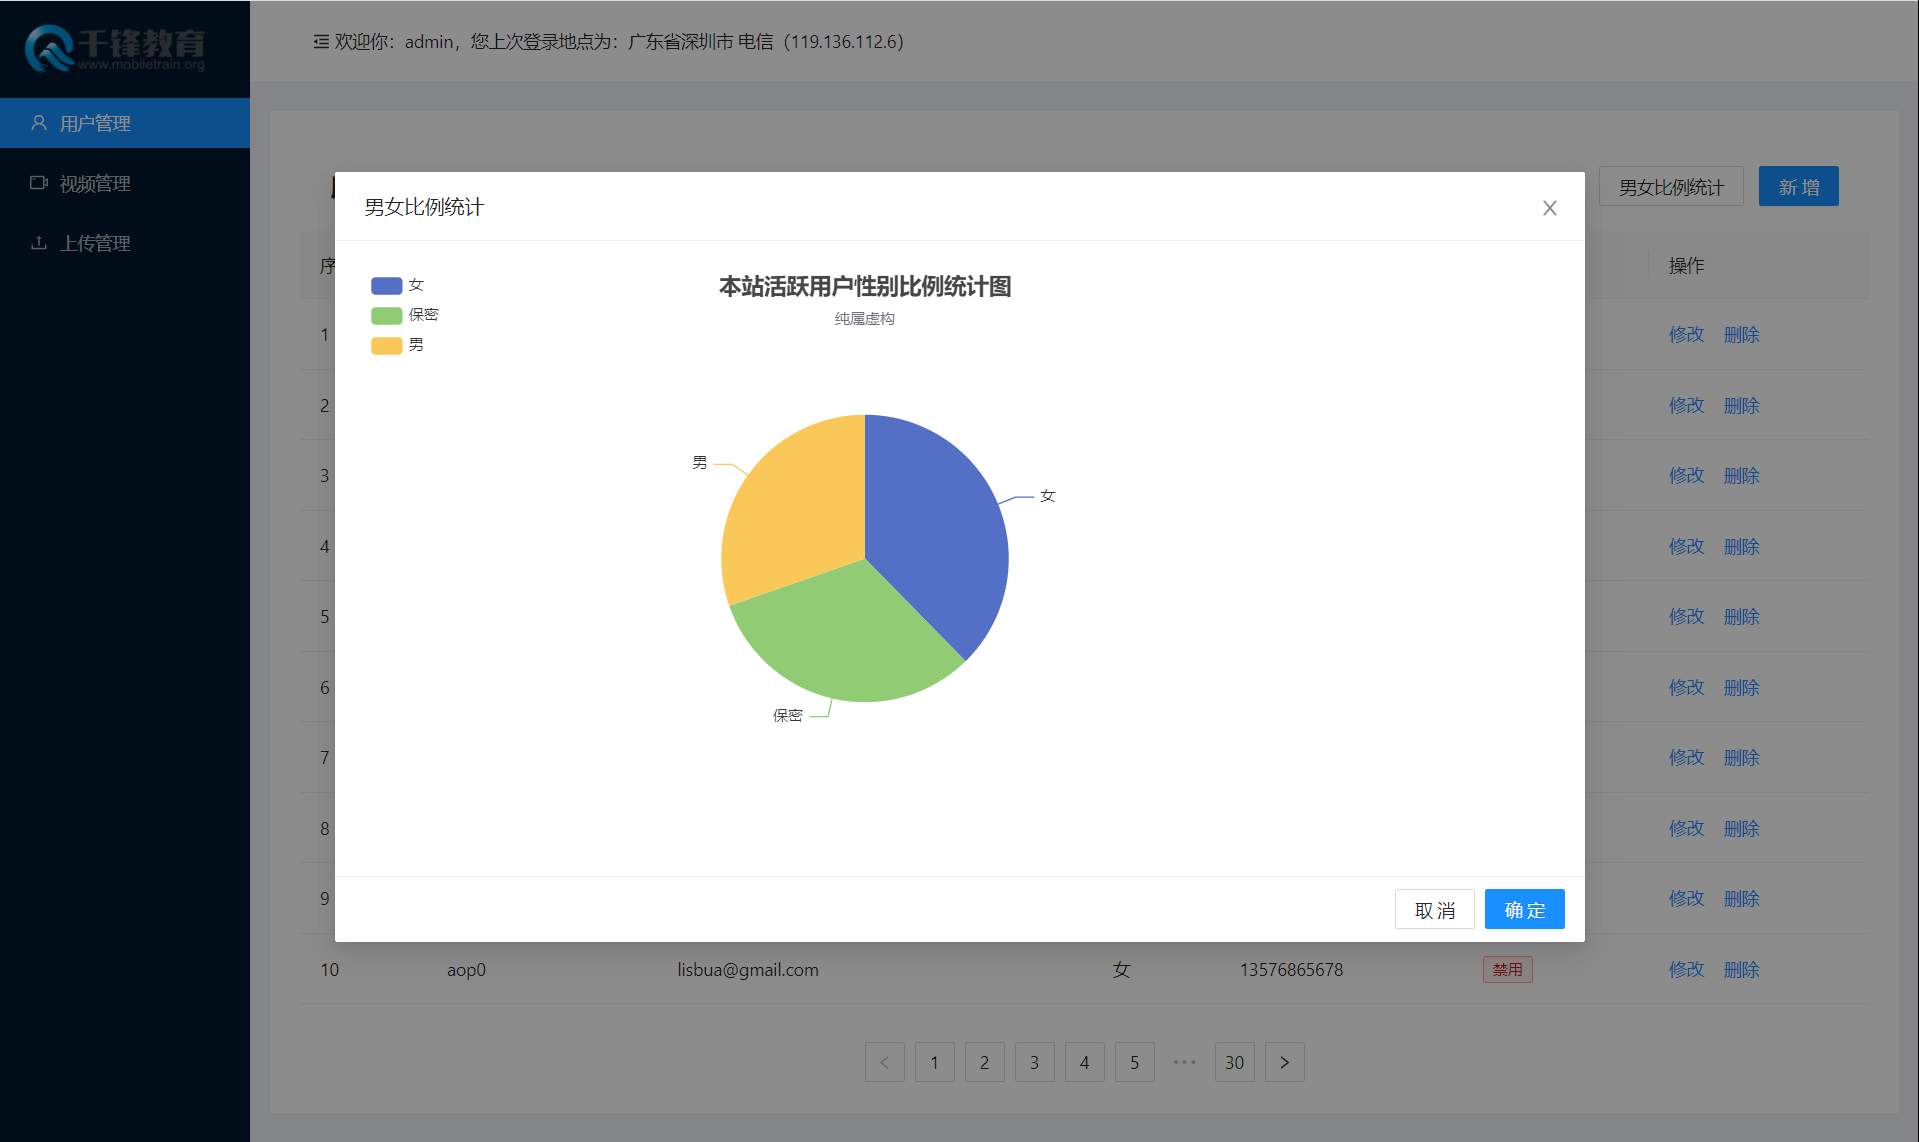
2.2、用户统计
含义:将数据通过前端插件,以丰富的图表的形式展现在界面上。【数据可视化】
数据可视化:
- 将数据展现成图表的形式:折线图、饼状图、柱状图等
- 地图上路径规划、POI标注等等
- 公司组织架构图
- 思维导图
案例:根据接口返回的男女数量的数据,展示合适图表
本次使用的插件库:echarts
官网:https://echarts.apache.org/
阿里的可视化组件库:https://antv.vision/
a. 安装echarts
b. 创建代码获取数据,展示数据
在url.js文件中定义请求数据的地址:
1
2
|
export const GET_STATISTICS_DATA = baseUrl + "/api/users/statistics";
|
在模型文件src/models/users.js中定义模型方法:
1
2
3
| getStatistics() {
return req.get(GET_STATISTICS_DATA);
},
|
完整的组件(src/views/dashboard/users/Index.jsx)代码:
1
2
3
4
5
6
7
8
9
10
11
12
13
14
15
16
17
18
19
20
21
22
23
24
25
26
27
28
29
30
31
32
33
34
35
36
37
38
39
40
41
42
43
44
45
46
47
48
49
50
51
52
53
54
55
56
57
58
59
60
61
62
63
64
65
66
67
68
69
70
71
72
73
74
75
76
77
78
79
80
81
82
83
84
85
86
87
88
89
90
91
92
93
94
95
96
97
98
99
100
101
102
103
104
105
106
107
108
109
110
111
112
113
114
115
116
117
118
119
120
121
122
123
124
125
126
127
128
129
130
131
132
133
134
135
136
137
138
139
140
141
142
143
144
145
146
147
148
149
150
151
152
153
154
155
156
157
158
159
160
161
162
163
164
165
166
167
168
169
170
171
172
173
174
175
176
177
178
179
180
181
182
183
184
185
186
187
188
189
190
191
192
193
194
195
196
197
198
199
200
201
202
203
204
205
206
207
208
209
210
211
212
213
214
215
216
217
218
219
220
221
|
import React, { Component } from "react";
import { PageHeader, Button, Table, Tag, Space, Pagination, Modal } from "antd";
import Model from "@/models/users";
import * as echarts from "echarts/core";
import { TitleComponent, TooltipComponent, LegendComponent } from "echarts/components";
import { PieChart } from "echarts/charts";
import { CanvasRenderer } from "echarts/renderers";
echarts.use([TitleComponent, TooltipComponent, LegendComponent, PieChart, CanvasRenderer]);
class Index extends Component {
state = {
paginate: {},
page: 1,
keyword: "",
visible: false,
statistics: [],
};
columns = [
{
title: "ID",
dataIndex: "id",
key: "id",
},
{
title: "用户名",
dataIndex: "username",
key: "username",
},
{
title: "邮箱",
dataIndex: "email",
key: "email",
},
{
title: "性别",
dataIndex: "gender",
key: "gender",
render: (gender) => {
switch (gender) {
case "1":
return "男";
case "2":
return "女";
default:
return "保密";
}
},
},
{
title: "状态",
key: "status",
dataIndex: "status",
render: (status) => <>{status === "1" ? <Tag color="green">正常</Tag> : <Tag color="red">禁用</Tag>}</>,
},
{
title: "操作",
key: "action",
render: (text, record) => (
<Space size="middle">
<a>编辑</a>
<a>删除</a>
</Space>
),
},
];
render() {
return (
<div>
{/* 页面头部 */}
<PageHeader
ghost={false}
title="用户管理"
subTitle="这是用户管理模块,当前实现的功能是用户列表!"
extra={[
<Button key="2" onClick={this.showModal}>
统计数据
</Button>,
<Button key="1" type="primary">
新增
</Button>,
]}
></PageHeader>
{/* 表格 */}
<Table columns={this.columns} dataSource={this.state.paginate.data} pagination={false} rowKey={(row) => row.id} />
{/* 后台分页实现 */}
<div style={{ marginTop: "20px", textAlign: "center" }}>
<Pagination defaultCurrent={this.state.page} total={this.state.paginate.total} onChange={this.changePage} showSizeChanger={false} />
</div>
{/* 统计的模态窗口 */}
<Modal
title="男女会员比例统计"
centered
visible={this.state.visible}
onOk={() => this.setVisible(false)}
onCancel={() => this.setVisible(false)}
width={1000}
>
{/* 这里放置图表 */}
<div id="main" style={{ height: "450px", width: "900px" }}></div>
</Modal>
</div>
);
}
setVisible = (flag) => {
this.setState(() => {
return {
visible: flag,
};
});
};
showModal = () => {
Model.getStatistics().then((ret) => {
if (ret.errNo === 0) {
this.setState(
() => {
return {
visible: true,
statistics: ret.data,
};
},
() => {
var chartDom = document.getElementById("main");
var myChart = echarts.init(chartDom);
var option;
option = {
title: {
text: "本站会员性别比例饼状图",
subtext: "数据来自于数据库",
left: "center",
},
tooltip: {
trigger: "item",
formatter: '{a} <br/>{b} : {c} ({d}%)'
},
legend: {
orient: "vertical",
left: "left",
},
series: [
{
name: "性别",
type: "pie",
radius: "60%",
data: this.state.statistics,
emphasis: {
itemStyle: {
shadowBlur: 10,
shadowOffsetX: 0,
shadowColor: "rgba(0, 0, 0, 0.5)",
},
},
},
],
};
option && myChart.setOption(option);
}
);
}
});
};
componentDidMount() {
this.loadData();
}
loadData = () => {
let obj = {
keyword: this.state.keyword,
page: this.state.page,
};
Model.getUserList(obj).then((ret) => {
this.setState(() => {
return {
paginate: ret.paginate,
};
});
});
};
changePage = (page, pageSize) => {
this.setState(
() => {
return { page };
},
() => this.loadData()
);
};
}
export default Index;
|

 微信
微信 支付宝
支付宝